
Openshift-Powered Homelab | Why, What, How

I wanted to build a Homelab for some time but it was taking a backseat as I always had access to cloud environments (eg: cloud accounts, VMware DC etc) and the use cases I was focusing on didn't really warrant for one. But lately, some new developments and opportunities in the industry triggered the need to explore use cases in a bare-metal server environment, ultimately leading to the built of my own homelab, called MetalSNO.

In this post, I will discuss some of my key reasons for building a homelab, the goals I set for it, and the process I followed to building one from scratch. I'll conclude with some reflections on whether it was truly worth it and what I plan to do with it going forward.


Compelling reasons (The Why)

My uses cases for a homelab weren't about hosting plex server, home automation etc (I have them on Raspberry PIs for some years now). My Homelab is really about exploring technologies and concepts that are on par with industry trend. Below are some of the key reasoning I gave to my myself: 

  • Cost effectiveness (main reason):  For my usecases, I needed compute capability with freedom. I compared the cost of running on aws vs hosted dedicated server (eg: equinix) vs in baremetal server at home. Interestingly running Homelab came out to be the most cheapest option for me. Here's a diagram with my cost calculation:


  • K8s and VMs on the same platform (Openshift): My past posts have mostly been about modern applications and cloud native tech stacks. So when I came across KubeVirt and Openshift/OKD virtualization (which is based on Kubevirt), it instantly picked my curiosity and I started thinking about the possibilities. So to get my hands on I thought an Openshift-on-baremetal backed Homelab would be nice. More on this coming in future post. In short, I can use Openshift to virtualize baremetal server and host VMs and K8s on the same platform.
  • Absence of ESXi: Pre 2024 ESXi was free and it was the defacto for virtualization. Now, post Broadcom's acquisition of VMware, that it is no longer the case and new options are surfacing. Some popular ones are Proxmoxxcp-ng and Openshift (opensource project is OKD). Yes, Openshift. This is what picked my interest as it offers unique capabilities where modern apps based on K8s meets legacy apps based on Virtual Machines. On top, Openshift can be installed on baremetal server.  
  • The cloud exit trend: It probably started to happen this year or at least I have come across few interesting articles on this topic this year. This mean virtualization may become/becoming a thing again and a homelab might be a good way to understand options, challenges and solutions.
    See articles here: 

Technical objectives (The What

  1. Homelab using Dell R620: I should be able install Openshift on the Dell R620 server without requiring any additional virtualization. Since this is a single server and not a cluster I need to leverage single node Openshift for this. 
  2. A functioning SNO (Single node Openshift): Openshift was the platform of choice because of its ability to run PODs and VMs the same way (which was a topic I wanted to explore). This meets the requirements to run containerized workloads as well as VM based workloads on the same platform the same way (eg: kubectl for both PODs and VMs, declarative definitions for both K8s objects like Ingress, PODs and VMs, single console for both containerized workloads as well as VMs based etc). The platform should function just like any other K8s cluster. The only relax I will do is on the infra resiliency part since this is a single node. 
  3. Remotely turn on or off the remote access to Homelab: There should be a way to remotely enable and disable the remote access to the homelab. When enabled, I should be able to access the Homelab from outside the home network (eg: over the internet). This must be done without exposing home network to the internet or compromising home network firewall. This method should be secured and sit behind protection mechanism (This is on top of Openshift's built in authentication mechanism (eg: password, certificate etc)). 

Building an Openshift powered Homelab (The How

While I’m satisfied with how my homelab ultimately turned out, the journey to get there was not as straightforward. 
In this section, rather than detailing the configuration and virtualization of a baremetal unit (which is well-covered in this blog), I’ll focus on the challenges I encountered and the solutions I implemented to overcome them. Think of it as a pre- and post-setup guide that helped bring my version of the homelab to life. 

My aim here is to documenting the process for future reference.

Here is a visual of my journey, from the initial ‘Desire to create a Homelab’ to the final ‘Homelab Ready’ state.


Milestone #1: Hardware


Buy new or buy used: One key decision was whether to buy used hardware (e.g., a Dell R620) or something new (like an Intel NUC). I ultimately opted for a used Dell R620 and, after some patient searching, found one in good condition (or so it appeared aesthetically on the eBay listing) with 24 cores and 192GB of memory. However, the server arrived without a disk and with only an onboard PERC controller. On top, with terms like SSD, SAS, SSHD, and HDD often used interchangeably online, it was challenging to figure out which type would be compatible with the R620. After researching, I bought two SSDs: a 500GB Crucial SSD for the boot/primary drive and a 1TB Fanaxian SSD for storage. For OpenShift, I specifically needed an SSD (the 500GB Crucial) for etcd and the OpenShift API, as etcd is sensitive to both disk and network latency. I chose the 1TB Fanaxian SSD for extra storage since it was cheap enough.

Connecting the server to the network: Since the Dell R620 only has a LAN ports (no wifi receiver), I faced a networking challenge because I didn’t have a LAN connection nearby to where I was placing the server, eg: garage. With no operating system installed, I wasn’t sure if a USB WiFi adapter would work. I tackled this by re-purposing an old TP-Link WiFi router as an access point. The TP-Link router provided 5 LAN ports, from which I used 2. One for the dedicated iDRAC port and another one for the Ethernet connection. This way the server machine became portable.

Upgrading firmware: Lastly, I discovered that the server's firmware hadn’t been updated since 2019, and the Chrome browser didn’t work well with the R620’s iDRAC interface. I downloaded multiple firmware updates onto a USB stick from Dell support (this was relatively easy), plugged in the USB to the server, and completed the update process by selecting files directly from the USB via server configuration menu—a time consuming but necessary step to be completed before the metal server became ready.


With the hardware configured and firmware upgraded the Dell R620 is now ready for virtualization. This achieves objective #1.

Milestone #2: Virtualization

Openshift base domain: OpenShift requires a base domain name (e.g., myhomelab.example.com). Rather than using a local domain, I decided to purchase a domain from Namecheap for $3.73. TBH, I probably didn't need one. But it came in handy later on when I configured the access to lab. It also future proofs the solution. 

Openshift ISO: The server (Dell R620) did not have any OS installed. So I needed a bootable ISO. OpenShift has a assisted installer process that creates the ISO file (available at console.redhat.com or for OKD through the offline installer described in the OKD docs). This made installing virtualization using openshift on the server straightforward. I created the ISO file using Red Hat console wizard. This is essentially CoreOS with an embedded ignition file that containing Openshift related configs such as base domain, pod cidr etc. I then flashed it onto a USB drive to create a boot-able USB. Oddly, the challenge I encountered, likely due to my hardware’s onboard PERC controller, was that the flashing the USB drive with Media Writer or DD tool available on my Fedora system did not work (the ISO boot kept erroring at the GRUB). To solve this, after days of scouring internet for solution, I moved the ISO file to a Windows machine and used the Rufus tool (rufus.ie; which is only available in exe format and is a recommended tool to flash USB for Dell R series servers) to flash the USB). Surprisingly, this resolved the issue, and the server was successfully booted from the USB and installed CoreOS on the node and Openshift on CoreOS. This blog provides a detailed guide on creating the Assisted Installer ISO with screenshots for installing Openshift on R620. I followed this blog the most part.

Openshift installation: Once the server was able to boot from the USB drive, it first installed CoreOS on the dell machine then installed Openshift based on the ignition configuration. I viewed the installation progress in the Red Hat Hybrid Cloud Console (from where I created the ISO file). Upon completion, on the console it displayed the IP address obtained from the home network’s DHCP server and the required A records. I mapped these in the /etc/hosts file on my machines (eg: Laptop). Up to this point, a real domain wasn’t necessary for OpenShift, as everything was resolved within my home network—but I’ll be making use of the domain name soon. Read on!


Now I have a functioning Openshift cluster running on a single bare metal server, Dell R620. This achieves objective #2.


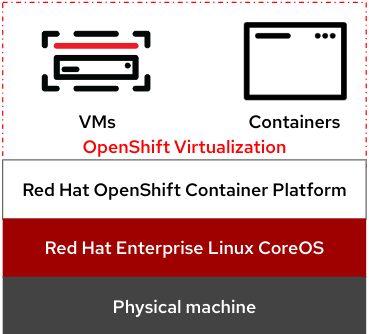
Milestone #3: Remote access

With the first two objectives achieved, I can now access my OpenShift-powered homelab from within my local network. However, I also wanted to enable on-demand remote access to the homelab over the internet. This is so that I can access the homelab from outside my home network (eg: work) on demand, without requiring a public IP.

TBH, I had a bit of fun solving for this. Here's what I did at a high level:

  1. Establish a private network over the internet: I accomplished this with Tailscale's default network at no cost. 
  2. Enable selective remote access: I add my laptop (on a different network) and a machine inside my home network to the private network (aka Tailnet) on demand. When remote access isn’t needed, I remove them from it. Neither of the machines is configured to auto-join or stay connected. This is setup to be manually done deliberately and it goes through a token-based authentication process at each joining time. This, too, was done with Tailscale at no cost.
  3. Route traffic between devices: With both devices connected to the Tailnet, I used SSHuttle on my laptop to route traffic from my laptop to the machine inside my home network, allowing access to services running in the lab such as the OpenShift console, K8s, Load balancer, VMs etc.
  4. Streamline remote management: While it’s easy to toggle the private network connection on my laptop, the process is less convenient for the VM in the home network. To solve this I configured Cloudflare's browser based ssh terminal to the VM. This was also free.
  5. A 24/7 machine or VM in the home network: Since this machine's purpose is to provide access to home network for accessing homelab and the homelab is capable for creating/hosting virtual machines,  I created a VM using Openshift Virtualization in the homelab for this purpose.
Here's a diagram to visually present the above:


I will attempt to describe the above diagram in the order of requirements and how I completed them.


Create & Configure Tailscale VPN Mesh:
I chose Tailscale to set up the private network because it’s free for personal use and super straightforward to configure. For now, I simply registered for a Tailscale account to get started.

Virtual Machine in the Home Network:
Using OpenShift Virtualization, I created a Fedora VM and exposed it via a MetalLB load balancer on port 22, assigning it a home network IP address. This setup allows me to SSH into the VM directly without needing virtctl. I'll dive deeper into this topic in a future post, but for now that’s all there is to it; simple.

Accessing the Fedora VM in the homelab over Internet using a Browser based SSH Terminal: 
To join the Fedora VM to the Tailnet without exposing the home network or my private IP to the internet and without compromising my home network firewall, I configured browser-based SSH using Cloudflare. Here’s the process I followed:
  1. Onboarded the base domain (e.g., example.com) to Cloudflare: I followed this documentation.
  2. Created a Cloudflare tunnel: For this I needed to install Cloudflared tool in my network to leverage proxy DNS from Cloudflare. I went to Cloudflare > Dashboard > Zero Trust > Network > Tunnel and initiated a docker based tunnel configuration. I only took the token from the generated command in the Cloudflare console discarding the whole docker run command.


  3. Cloudflared K8s deployment: I created Cloudflared tool's K8s deployment yaml using the token and deployed it on Openshift K8s. This allows to set up proxy DNS record for any service on the platform that has an IP from home network's range. I installed MetalLB Load Balancer on Openshift and configured it for an IP range/pool/IPAM of the home network. In this case, the load balancer's IP address is used to expose Fedora VM on port 22 (for SSH).
    yaml for Cloudflared deployment:
    
    apiVersion: apps/v1
    kind: Deployment
    metadata:
      labels:
        app: cloudflared
      name: cloudflared-deployment
      namespace: default
    spec:
      replicas: 2
      selector:
        matchLabels:
          pod: cloudflared
      template:
        metadata:
          creationTimestamp: null
          labels:
            pod: cloudflared
        spec:
          containers:
            - command:
                - cloudflared
                - tunnel
                - --no-autoupdate
                # In a k8s environment, the metrics server needs to listen outside the pod it runs on.
    # The address 0.0.0.0:2000 allows any pod in the namespace. - --metrics - 0.0.0.0:2000 - run args: - --token - <token value> image: cloudflare/cloudflared:latest name: cloudflared livenessProbe: httpGet: # Cloudflared has a /ready endpoint which returns 200 if and only if # it has an active connection to the edge. path: /ready port: 2000 failureThreshold: 1 initialDelaySeconds: 10 periodSeconds: 10


    MetalLB configs after installing the operator on openshift via operator hub.

    
    ---
    apiVersion: metallb.io/v1beta1
    kind: L2Advertisement
    metadata:
      name: l2-adv-sample1
      namespace: metallb-system
    ---
    apiVersion: metallb.io/v1alpha1
    kind: IPAddressPool
    metadata:
      namespace: metallb-system
      name: homelab-svc-addr-pool
    spec:
      protocol: layer2
      addresses:
      - 192.168.1.10-192.168.1.30 
    
    # Sample SVC using the pool
    kind: Service
    apiVersion: v1
    metadata:
      name: expose-fedora-vm
      namespace: myvms
      annotations:
        metallb.universe.tf/ip-allocated-from-pool: homelab-svc-addr-pool
    spec:
      ports:
        - name: ssh
          protocol: TCP
          port: 22
          targetPort: 22
      type: LoadBalancer
      selector:
        kubevirt.io/domain: fedora-vm


  4. Observe if Cloudflared is deployed correctly: After deploying the Cloudflared and confirming that the pod was running successfully, I verified that the tunnel was in a healthy state in the Cloudflare console.
  5. Assign a Public Hostname to the Fedora VM: In the Cloudflare console I edited the newly created Cloudflare tunnel entry for the base domain and added a subdomain (eg: fedora.example.com) for the Fedora VM using the private IP assigned to it. Note: Cloudflare $0 subscription only caters tls for first level subdomain; nested subdomain requires premium subscription and $$$.
  6. Set Up Cloudflare Access Application to Enable Browser-Based SSH: To enable SSH into the Fedora VM via browser I created Cloudflare > Zero Trust > Access > Application > FedoraSSH application.  I followed this YouTube guide with some of my own adjustments, like restricting access by a full and single email address, geo-location, password protected key file etc.
Here's a screen shot of the zero trust access application creation:


That's it. I can now ssh in to the FedoraVM over the internet using a browser based terminal and I did not have to expose any port/part of my home router or compromise firewall.


Configure machines for Tailnet: 
With access to the Fedora VM sorted, it's time to configure the "join/remove machines to/from the Tailnet on demand" functionality. Here's how I did it:
  1. Install the Tailscale Client:
    • I installed the Tailscale client on both the remote machine (eg: laptop) and the Fedora VM.
    • On Linux, the Tailscale client runs as a service by default, but I chose not to enable it. Instead, I manually start and stop the service as needed. 
  2. Authenticate the Machines:
    • After installing the Tailscale tool, the first time I executed the sudo tailscale up command, it prompted for authentication. After successful authentication, Tailscale generated an access token and a refresh token in the background.
  3. Connect Machines to the Tailnet:
    • Once authenticated, I ran the sudo tailscale up command on both the remote machine and the Fedora VM. This adds the machines to my private Tailnet and assigning them ip addresses from the Tailnet network. I verified that both devices appeared in the Tailscale dashboard. I recorded this IP address for further use.
  4. Connected Machines:
    • Once connected to the Tailnet, my laptop (in a work network) and the Fedora VM (in my home network) were both part of the same Tailnet. This allowed me to interact with the Fedora VM (e.g., ping or SSH) directly from the laptop’s terminal. As the FedoraVM is also in my home network I now have access to the services (eg: Openshift) inside my home network via the FedoraVM.

Note: I only need to use this when I am outside my home network and need to access my homelab. 

Using SSHuttle to route traffic from remote machine to home network:
Now that the machines are connected I can use the Fedora VM as a gateway to my home network. Although, Tailscale Subnet Router feature (by passing the --advertise-routes flag) could be used here, I opted for a familiar path, that I used before, using SSHuttle. For all network traffic the command is: sshuttle -r user@<tailnet-ip> 0.0.0.0/0 -vv. For more targeted traffic (eg: K8s api) the command is: ssh -fNT -L 6443:api.openshift.example.com:6443 user@<tailnet-ip>.
 

Turn on or off remote access to the homelab:
The requirement here is not to have homelab connected to a vpn type of thing all the time rather "turn on the access" when needed and after the task is complete "turn off the access". With the above mechanism in place I can do now do that.
  • Turn on access:
    • Access the FedoraVM via browser (with 2FA authentication and then a identity verification) > Start the Tailscale service (sudo systemctl start tailscaled) > Join the FedoraVM to the Tailnet (sudo tailscale up).
    • On the remote machine do the same tailscale connect.
    • When both machines are on the Tailnet start SSHuttle on the remote machine. 
  • Turn off access:
    • On remote machine stop the SSHuttle to stop the traffic flow to FedoraVM > Tailscale down (sudo tailscale down) > and stop tailscaled service (sudo systemctl stop tailscaled). This will remove the remote machine from Tailnet.
    • Via browser on the FedoraVM do the same. This will remove FedoraVM from Tailnet.
    • And that's it. The homelab remote access is turned off.
Objective #3 achieved.


Observation: I can power off the server and nothing gets broken from openshift perspective; this means more cost saving:
To save costs I decided the power off the server for several days (I took a short break). When I powered it back on the Openshift cluster came back online with its last state. Surprisingly, nothing was broken. I was impressed by this outcome/resiliency. This opens up the possibility to no run homelab 24/7; instead I could automate it to turn off for the weekend or overnight. This will further reduce the estimated cost.

Conclusion: Was it worth it?

Yes, Absolutely.
 
As organizations gain a deeper understanding of the benefits vs costs of the cloud computing, opportunities for creating hybrid cloud solutions will continue to expand. The AI usecases may add few more rationale for private Data Centers. This is just my prediction. So, I am hoping that my homelab will give me hands on experience of that perspective. 

Through the usage of cloud native technologies the functional parities between on prem DCs and clouds are also increasing (Openshift being a great example of that). This means operation processes are going to be similar between clouds and on prem. A homelab is a great way to be creative and explore those possibilities.   

As per m cost calculation my homelab yields much better cost savings. I think my decision to build my own homelab using Openshift was a right one. 

As an added bonus it has given me some experience with hardware configs.
More over, the homelab is going to give me more control to explore solutions that were somewhat restricted in the other options I considered. This is a win-win-win in my book thus far.

What's next:

This homelab is just a means to having an environment to explore interesting solutions and usecases such a GitOps based VMs, Self Service portal, AI workload etc. Keep an eye in space, more interesting things are coming...

Until then, thanks for reading. Keep calm and homelab. 


Comments

Popular posts from this blog

The story of a Hack Job

"So, you have hacked it" -- Few days ago one of the guys at work passed me this comment on a random discussion about something I built. I paused for a moment and pondered: Do I reply defending how that's not a hack. OR Do I just not bother I picked the second option for 2 reasons: It was late. It probably isn't worth defending the "hack vs" topic as the comment passed was out of context. So I chose the next best action and replied "Yep, sure did and it is working great.". I felt like Batman in the moment. In this post I will rant about the knowledge gap around hacking and then describe about one of the components of my home automation project (really, this is the main reason for this post) and use that as an example how hacking is cool and does not always mean bad. But first lets align on my definition of hacking: People use this term in good and bad, both ways. For example: "He/she did a hack job" -- Yeah, that probably...

Hall of justice - Authorisation Greeting System

Ever since I watched the Young Justice EP-1 the security system of the Hall Of Justice and Mount Justice wow-ed me. After all it was built by Batman. You see similar AI driven voice guided system in pretty much in all sci-fi series these days. I always dreamed of having something similar of my own. Well, now I have it (sort of). Although we not quite in the flying cars era yet (disappointment) but IOT powered locks are somewhat normal these days. The adoption rate is great.  Some background: What is this Hall Of Justice Authorisation system? This is the security system that Batman built for Hall Of Justice. The movies haven't shown it yet but there're several scenes in the animated series and comic books. Basically, it is a AI powered voice guided intelligent security system that scans bio signatures (like retina, body dimensions, temperature, heart rate) through a scanning device and identifies which member of the justice league it is, logs entry then gr...

Kubectl using SSH tunnel for TKG K8s Clusters

We know SSH'ing and probably many knows about SSH tunnel. The way, in my opinion, these 2 (SSH and SSH tunnel) are different to me (and I am in favor of SSH Tunnel) is how I use it. From tooling perspective I would almost always do tunnel instead of direct ssh.  In this post I will describe how to do SSH tunnel for kubectl to interact with remote kubernetes cluster (Specifically Tanzu Kubernetes Grid aka TKG cluster). Get the project ready to go from my github:  https://github.com/alinahid477/vsphere-with-tanzu-wizard Topics Backstory SSH tunnel for TKG Clusters using Docker container Technical stuff: Tunnel through Bastion for TKG K8s cluster Technical stuff: SSH Tunnel for Kubectl for remote K8s Clusters (same with or without docker) Technical stuff: Explain me this A famous quote from Darth Vader himself: "Feel the power of SSH Tunnel" Backstory Why ssh or ssh tunnel? The below diagram shows in what scenario a SSH or SSH Tunnel almost becomes a necessity. Let's st...

Smart wifi controlled irrigation system using Sonoff and Home Assistant on Raspberry Pi - Part 1

If you have a backyard just for the sake of having one or it came with the house and you hate watering your garden or lawn/backyard then you have come to the right place. I genuinely believe that it is a waste of my valuable time. I would rather watch bachelorette on TV than go outside, turn on tap, hold garden hose in hand to water. Too much work!! Luckily, we have things like sprinkler system, soaker etc which makes things a bit easy. But you still have to get off that comfy couch and turn on tap (then turn off if there's no tap timer in place). ** Skip to the youtube video part if reading is not your thing   When I first moved into my house at first it was exciting to get a backyard (decent size), but soon that turned on annoyance when it came down maintaining it, specially the watering part. I laid bunch sprinklers and soaker through out the yard and bought tap timer but I still needed to routinely turn on the tap timer. Eventually few days ago I had enough of this rub...

CKA Exam; May 2024: My take on it and cheat sheet

So, I finally got the little green tick of having CKA certification in my certification list. I put off this exam for so long that it seriously became not funny anymore. The internet has quite literally way more than 1000 posts on this topic. But what harm would one more post cause? So here's mine. I will write it from my perspective. I am writing this post just in case if anyone benefits from it, as I predict there could be many on the same boat as me. Background: Kubernetes, modern application architecture, DevSecOps etc are not new territory for me. In fact, I think I am fairly versed in K8s and related tech stack. But due my own imposter syndrome I have been putting off sitting the CKA exam. However, last week I thought about the CKA as "just another approval for my skills" and got the nudge to sit the exam.  Here's what I did till the day I sat for the exam. (Everybody is different but the below worked for me the best) The preparation: As I have been working with...